Azure DevOps & Desktop application
Learn how to automate the delivery of your Dektop applications with Azure DevOps. More specifically, automatically create the installer for your application at each push in git via InnoSetup.
Version française disponible ici : Azure DevOps & Application Dektop
Introduction
The DevOps movement has been running for a few years already and this is reflected in the growing demands of customers, the trainings provided and above all its growing usage within many development teams. Yet, behind this "Buzz Word" are hidden concepts that are not new. The CI / CD, agile methodologies, tools / processes / roles linked to DevOps were already widely used by software publishers, guaranteeing the quality of their software and therefore their image, directly linked to their sales.
The democratization of these methods has however allowed everyone to access and understand the concepts, allowing to deliver better and sooner new versions of an application, whether it is ann in house software or regarding a customer order.
SaaS solutions are the key targets for these methodologies since the end customer has nothing to do to benefit the updates. However, desktop-type applications, formerly known as "thick clients" can take full advantage of modern tools to facilitate regular distribution, and that is what we will see right away!
DevOps brings together a complete set of processes and good practices, but we will make the shortcut here to speak mainly in this article of the CI / CD.
CI / CD for Desktop applications
What do we mean when we talk about CI / CD in the context of Desktop application? To keep it simple in the definition, it is the set of means and tools used to deliver to the client a final version of the application while ensuring the quality of delivery.
We will therefore automate the entire process of providing our application using Azure DevOps pipelines:
- Building a WPF application
- Launch the unit tests to ensure the quality of the build
- Create the setup.exe installer
- Deploy this installer
- Inform our users of the availability of a new version
As often in posts, we will stay on a simple WPF application case, but you will be able from there to enlarge according to your own use case.
Implementation of the test application
So I created a WPF application in .NET 4.7.2 integrating the excellent MVVM Light (made by a Frenchman, a bit of chauvinism never did any harm 😉). It will be a simple calculator with the basic operations Add / Subtract / Multiply / Divide and management errors in case of division by zero. I also added the unit testing project associated with this calculator.

I then created an Azure DevOps project in which I hosted the source code (you can find the link at the end of this article) and which will allow us to create the build and deployment pipelines for our WPF application.
Creation of the build pipeline
The basis of our build pipeline is fairly standard, it consists of several tasks that will allow us to build, test and then host the build artifacts in the Azure DevOps project space.
To do this, we will use a template already existing in the Azure DevOps environment. Note that two ways are possible regarding the creation of a build pipeline: graphical interface or YAML configuration file. We will use the YAML configuration file in this example which is the one recommended by Microsoft.
It will therefore be necessary to create a new Build pipeline, then choose where the source code is stored, Azure Repos Git in our case. Then you will have to choose the Git repository to use to retrieve the code to build. Then comes the choice of the basic template to use for this Pipeline, in our case the ".NET Desktop" corresponds to what we need.
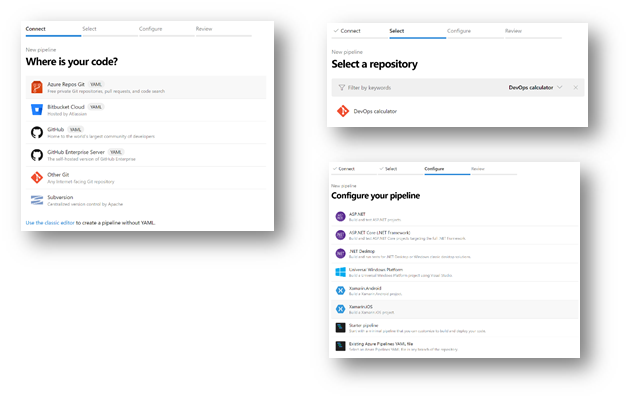
You will then see the YAML file that will be generated as the basis for our build pipeline. It contains several entities:
- trigger: On which trigger should the build be executed. By default, on a push onto the master branch.
- pool: Which agent should be used for this build action. By default, a Windows machine hosted by Microsoft.
- variables: A set of variables used in the pipeline
- steps: The steps of our build process, 4 in this example:
- Installation of nuget tools
- Installation of nuget packages
- Launch of the solution build
- Launch of unit tests
We will add the tasks necessary for the publication of build artifacts in order to be able to recover them from the release pipeline. The creation of this YAML file results in the addition of the azure-pipelines.yaml file to the root of your repository.
# .NET Desktop
# Build and run tests for .NET Desktop or Windows classic desktop solutions.
# Add steps that publish symbols, save build artifacts, and more:
# https://docs.microsoft.com/azure/devops/pipelines/apps/windows/dot-net

trigger:
- master

pool:
  vmImage: 'windows-latest'

variables:
  solution: '**/*.sln'
  buildPlatform: 'Any CPU'
  buildConfiguration: 'Release'

steps:
- task: NuGetToolInstaller@0

- task: NuGetCommand@2
  inputs:
    restoreSolution: '$(solution)'

- task: VSBuild@1
  inputs:
    solution: '$(solution)'
    platform: '$(buildPlatform)'
    configuration: '$(buildConfiguration)'

- task: VSTest@2
  inputs:
    platform: '$(buildPlatform)'
    configuration: '$(buildConfiguration)'

- task: CopyFiles@2
  inputs:
    SourceFolder: 'MyCalculator\\bin\\Release'
    Contents: '**'
    TargetFolder: '$(Build.ArtifactStagingDirectory)'

- task: PublishBuildArtifacts@1
  inputs:
    PathtoPublish: '$(Build.ArtifactStagingDirectory)'
    ArtifactName: 'drop'
    publishLocation: 'Container'
At the end of the first run, all the lights should be green, meaning that all the stages have passed (including that all the unit tests have passed).
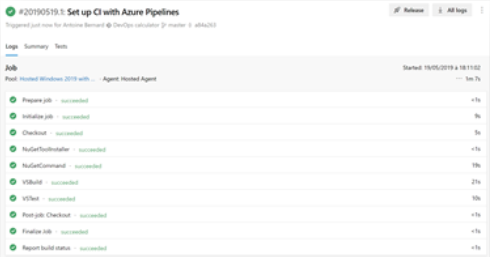
We are now ready to take the next step, more specific to our Desktop application: creating the installer.
Installer creation
There are several options available to us to build an installer that we can distribute to our customers. I chose Inno Setup for this example. The installer can be created either in the Build pipeline or in the Release pipeline. Doing so in the Build pipeline makes sure that our Inno Setup script is still working with our application update. It also allows you to refuse Pull Requests if the installation script does not work properly.
So I added a fairly standard .iss script that takes all the DLL, EXE and conf files to be deployed by the installer.
[Setup]
; NOTE: The value of AppId uniquely identifies this application.
; Do not use the same AppId value in installers for other applications.
; (To generate a new GUID, click Tools | Generate GUID inside the IDE.)
AppId={{23F2EF2D-4F19-43FC-A598-16A78387ADA9}
AppName=My DevOps calculator
AppVersion=1.0
;AppVerName=My DevOps calculator 1.0
AppPublisher=Ensilog
AppPublisherURL=https://ensilog.visualstudio.com/DevOps calculator
AppSupportURL=https://ensilog.visualstudio.com/DevOps calculator
AppUpdatesURL=https://ensilog.visualstudio.com/DevOps calculator
DefaultDirName={pf}\My DevOps calculator
DefaultGroupName=My DevOps calculator
AllowNoIcons=yes
OutputBaseFilename=DevOpsCalc-setup
Compression=lzma
SolidCompression=yes

[Tasks]
Name: "desktopicon"; Description: "{cm:CreateDesktopIcon}"; GroupDescription: "{cm:AdditionalIcons}"; Flags: unchecked
Name: "quicklaunchicon"; Description: "{cm:CreateQuickLaunchIcon}"; GroupDescription: "{cm:AdditionalIcons}"; Flags: unchecked; OnlyBelowVersion: 0,6.1

[Files]
Source: "bin/Release/*.dll"; DestDir: "{app}"; Flags: ignoreversion
Source: "bin/Release/*.exe"; DestDir: "{app}"; Flags: ignoreversion
Source: "bin/Release/*.exe.config"; DestDir: "{app}"; Flags: ignoreversion
; NOTE: Don't use "Flags: ignoreversion" on any shared system files

[Icons]
Name: "{group}\My DevOps calculator"; Filename: "{app}\MyCalcutator.exe"
Name: "{group}\{cm:UninstallProgram,My DevOps calculator}"; Filename: "{uninstallexe}"
Name: "{commondesktop}\My DevOps calculator"; Filename: "{app}\MyCalcutator.exe"; Tasks: desktopicon

[Run]
Filename: "{app}\MyCalcutator.exe"; Description: "{cm:LaunchProgram,My DevOps calculator}"; Flags: nowait postinstall skipifsilent
To add the creation of the installer to our Build pipeline, we are going to add 2 tasks:
- One in charge of downloading and installing Inno Setup using Chocolatey (installed as standard on build machines hosted by Microsoft)
- One in charge of running Inno Setup with the .iss script (Inno Setup extension) responsible for creating the installer.
We will then have to clean the elements put in the output, since we will only need the installer.
The last task that remains to be done is simply to create a Release pipeline to push the output artifact of Build on a file server (ex: FTP) with a link to send to customers!
Here is the final YAML file of our Build pipeline:
trigger:
- master

pool:
  vmImage: 'windows-latest'

variables:
  solution: '**/*.sln'
  buildPlatform: 'Any CPU'
  buildConfiguration: 'Release'

steps:
- task: NuGetToolInstaller@0

# Install Inno Setup with chocolatey
- task: PowerShell@2
  displayName: 'Inno setup download'
  inputs:
    targetType: 'inline'
    script: 'choco install innosetup'

- task: NuGetCommand@2
  inputs:
    restoreSolution: '$(solution)'

- task: VSBuild@1
  inputs:
    solution: '$(solution)'
    platform: '$(buildPlatform)'
    configuration: '$(buildConfiguration)'

- task: VSTest@2
  inputs:
    platform: '$(buildPlatform)'
    configuration: '$(buildConfiguration)'

# Execute install script
- task: PowerShell@2
  displayName: 'Execute Inno Setup script'
  inputs:
    targetType: 'inline'
    script: 'iscc.exe MyCalculator\\setup.iss'

# Copy setup into ArtifactStaging folder
- task: CopyFiles@2
  displayName: 'Copy setup to artifact'
  inputs:
    SourceFolder: 'MyCalculator\\Output'
    Contents: '**'
    TargetFolder: '$(Build.ArtifactStagingDirectory)'

# Publish artifact
- task: PublishBuildArtifacts@1
  inputs:
    PathtoPublish: '$(Build.ArtifactStagingDirectory)'
    ArtifactName: 'drop'
    publishLocation: 'Container'
Conclusion
It would of course have been possible to cover a lot more in this article but it already gives you a good overview and solid leads to automate your processes related to the quality and delivery of your Desktop applications.
Here are some other ideas to go further:
- Signature of the application and / or installer assembly
- Integration of Application Insights to obtain effective tracing of deployed versions.
- Use of ClickOnce (or any other system) to offer an automatic update of the application when it starts.
- Multi-stage management to test our installers in staging before sending them to production.
Appendices
- The Azure DevOps project, on which you can find all the elements mentioned in this article: https://dev.azure.com/ensilog/DevOps%20calculator
- For more information on Chocolatey: https://chocolatey.org
- The Inno Setup package on Chocolatey: https://chocolatey.org/packages/InnoSetup/5.6.1.20190126
- More info on Inno Setup: http://www.jrsoftware.org/isinfo.php